How To Remove Acrylics With Acetone: A Step-by-Step Guide
Removing acrylic nails can be a daunting task, but with the right approach, it doesn't have to be. Acetone is one of the most effective and widely used methods for safely dissolving acrylic nails. If you're looking to remove acrylics with acetone, this guide will walk you through the process step by step, ensuring your nails remain healthy and undamaged.
Acrylic nails are a popular choice for those seeking long-lasting, durable nails. However, when it's time to take them off, many people wonder how to remove acrylics with acetone safely. This article will provide you with all the information you need, from preparation to aftercare, so you can confidently remove your acrylics at home.
Whether you're a beginner or someone who has done this before, understanding the correct process is essential for maintaining healthy nails. Let's dive into the details of how to remove acrylics with acetone effectively.
Read also:When Did Roaring Kitty Buy Gme A Comprehensive Deep Dive
Table of Contents
- Introduction to Acrylic Nails
- Tools You'll Need
- Preparing to Remove Acrylics
- Step-by-Step Process
- Common Mistakes to Avoid
- Tips for Healthy Nails After Removal
- Alternatives to Acetone
- Frequently Asked Questions
- Statistics on Acrylic Nail Usage
- Conclusion
Introduction to Acrylic Nails
Acrylic nails have become a staple in the beauty industry due to their strength and versatility. They are made by applying a liquid monomer and powder polymer mixture onto the natural nail, creating a hard, durable surface. Over time, acrylics may start to lift or become uncomfortable, prompting the need for removal.
Why Choose Acetone?
Acetone is a powerful solvent that effectively breaks down the adhesive properties of acrylic nails. It is widely available, affordable, and safe to use when handled properly. When learning how to remove acrylics with acetone, it's crucial to understand the chemical process involved.
Tools You'll Need
Before you begin, gather all the necessary tools to ensure a smooth and efficient removal process. Here's a list of items you'll need:
- 100% pure acetone nail polish remover
- Cotton balls or pads
- Aluminum foil
- Cuticle pusher or orangewood stick
- Emery board or nail file
- Cotton swabs
- Cuticle oil or moisturizer
Preparing to Remove Acrylics
Preparation is key to ensuring a safe and effective removal process. Follow these steps to get ready:
- Ensure your workspace is well-ventilated, as acetone fumes can be strong.
- Wash your hands thoroughly to remove any dirt or oils from the nails.
- Trim your acrylic nails to reduce the amount of material that needs to be removed.
Creating a Comfortable Environment
Set up your workspace in a comfortable area where you can sit for an extended period. Have all your tools within reach to avoid interruptions during the process.
Step-by-Step Process
Now that you're prepared, let's dive into the step-by-step guide on how to remove acrylics with acetone:
Read also:Dutch Wonderland Winter Wonderland Hours A Magical Experience For The Whole Family
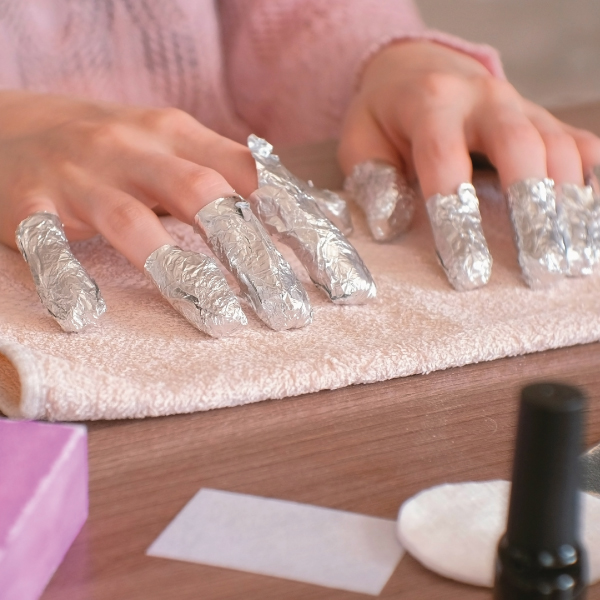
Step 1: Soak the Cotton Balls
Soak cotton balls in pure acetone, ensuring they are fully saturated. Avoid using cotton with added lotions or oils, as these can interfere with the acetone's effectiveness.
Step 2: Wrap Each Nail
Place a soaked cotton ball on each nail and wrap it securely with aluminum foil. This creates a seal that allows the acetone to penetrate the acrylic.
Step 3: Wait for 10-15 Minutes
Let the acetone work its magic by leaving the foil wraps on for 10-15 minutes. During this time, the acrylic will begin to soften and dissolve.
Step 4: Gently Remove the Acrylic
After the waiting period, unwrap each nail and use a cuticle pusher or orangewood stick to gently scrape off the softened acrylic. Be careful not to damage your natural nail.
Step 5: File Down Remaining Acrylic
If any acrylic residue remains, use an emery board or nail file to gently file it away. Avoid applying too much pressure to prevent injury.
Common Mistakes to Avoid
While removing acrylics with acetone is relatively straightforward, there are a few common mistakes to avoid:
- Using non-pure acetone, which may not effectively dissolve the acrylic.
- Leaving the foil wraps on for too long, which can dry out your nails and cuticles.
- Being too aggressive when scraping off the acrylic, potentially damaging your natural nails.
Tips for Healthy Nails After Removal
Once your acrylics are removed, it's important to care for your natural nails to promote healthy growth. Follow these tips:
- Moisturize your cuticles and nails regularly to prevent dryness.
- Avoid using harsh chemicals on your nails immediately after removal.
- Consider taking a break from acrylics to allow your nails to recover.
Nourishing Your Nails
Using a cuticle oil or nail strengthener can help restore moisture and improve the condition of your nails after removal.
Alternatives to Acetone
While acetone is the most effective method for removing acrylics, some people prefer alternatives due to its strong smell or potential drying effects. Here are a few options:
- Non-acetone nail polish remover with added oils
- Tea tree oil mixed with olive oil
- Lemon juice and baking soda paste
Frequently Asked Questions
Can I Remove Acrylics Without Acetone?
Yes, but it may take longer and require more effort. Non-acetone methods involve soaking the nails in warm water or using natural oils to soften the acrylic.
How Often Should I Remove Acrylic Nails?
It's recommended to take a break from acrylics every 6-8 weeks to allow your natural nails to breathe and recover.
Statistics on Acrylic Nail Usage
According to a study by the International Nail Technician Association, approximately 25% of women in the United States have worn acrylic nails at some point. This highlights the popularity of acrylic nails and the importance of proper removal techniques.
Conclusion
Removing acrylic nails with acetone is a simple and effective process when done correctly. By following the steps outlined in this guide, you can safely remove your acrylics at home and maintain healthy natural nails. Remember to take care of your nails after removal and consider alternatives if acetone isn't suitable for you.
We invite you to share your experience or ask questions in the comments below. Additionally, explore our other articles for more tips and tricks on nail care and beauty. Together, let's keep your nails looking their best!
Sources:
- International Nail Technician Association
- Mayo Clinic: Nail Care Tips
- American Academy of Dermatology


