How To SSH Into A Raspberry Pi: A Comprehensive Guide
Learning how to SSH into a Raspberry Pi can be an essential skill for anyone working with this versatile mini-computer. Whether you're managing your Raspberry Pi remotely or setting up headless operations, SSH provides a secure and efficient way to interact with your device. In this guide, we will walk you through the entire process step by step, ensuring that even beginners can successfully set up and use SSH.
SSH, or Secure Shell, is a protocol used to securely connect to remote devices. It allows users to control and manage their Raspberry Pi without needing physical access to the device. This is particularly useful in scenarios where the Raspberry Pi is located in a different location or when you want to save time by avoiding direct interaction.
This article will provide a detailed explanation of how to SSH into a Raspberry Pi, covering everything from enabling SSH on your Raspberry Pi to troubleshooting common issues. By the end of this guide, you'll have the knowledge and confidence to perform remote operations on your Raspberry Pi seamlessly.
Read also:Tony Hawk Still Skating The Living Legend Who Never Stopped Rolling
Table of Contents
- How to Enable SSH on a Raspberry Pi
- System Requirements for SSH
- Finding the Raspberry Pi IP Address
- Connecting to Raspberry Pi via SSH
- Choosing the Best SSH Clients
- Headless Setup for Raspberry Pi
- Enhancing SSH Security
- Troubleshooting Common SSH Issues
- Use Cases for SSH in Raspberry Pi
- Conclusion
How to Enable SSH on a Raspberry Pi
Before you can SSH into a Raspberry Pi, you need to ensure that SSH is enabled on the device. This process varies slightly depending on whether you're using the Raspberry Pi OS with a graphical interface or a headless setup.
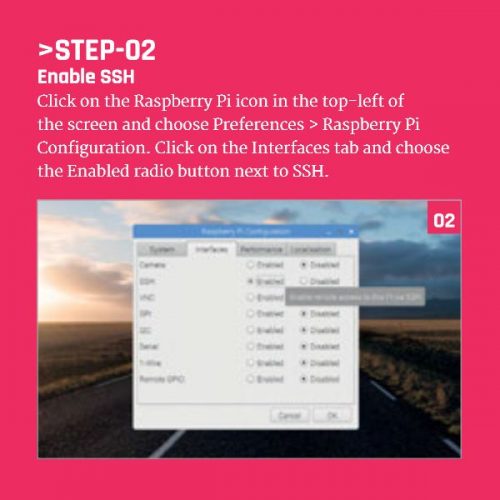
Enabling SSH Through Raspberry Pi OS
If you're using the Raspberry Pi OS with a graphical user interface, follow these steps:
- Open the Raspberry Pi Configuration tool from the Preferences menu.
- Navigate to the Interfaces tab.
- Set SSH to Enabled.
- Reboot your Raspberry Pi to apply the changes.
Alternatively, you can enable SSH from the terminal by running:
sudo raspi-config
From there, select Interfacing Options, then SSH, and choose "Yes" to enable it.
Enabling SSH on a Headless Raspberry Pi
For a headless setup where you don't have access to a monitor or keyboard, you can enable SSH by placing a file named "ssh" (without any extension) into the boot directory of your Raspberry Pi's SD card. This simple step tells the Raspberry Pi to enable SSH during its first boot.
Read also:Ozempic Side Effects A Comprehensive Guide Before And After Treatment
System Requirements for SSH
Before diving into the process of SSH into a Raspberry Pi, ensure that your system meets the following requirements:
- A Raspberry Pi device with Raspberry Pi OS installed.
- An active internet connection on both your Raspberry Pi and the device you're connecting from.
- An SSH client installed on the device you're using to connect (most modern operating systems come with built-in SSH clients).
- Basic knowledge of terminal commands and networking concepts.
Having these prerequisites in place will make the process smoother and more efficient.
Finding the Raspberry Pi IP Address
To SSH into a Raspberry Pi, you need to know its IP address. Here's how you can find it:
Using the Terminal
If you have access to the Raspberry Pi's terminal, you can find the IP address by running the following command:
hostname -I
This will display the IP address assigned to your Raspberry Pi.
Using a Network Scanner
Alternatively, you can use a network scanning tool like Angry IP Scanner or Advanced IP Scanner to discover the IP address of your Raspberry Pi on your local network.
Connecting to Raspberry Pi via SSH
Once you have enabled SSH and obtained the IP address of your Raspberry Pi, you can establish a connection using an SSH client. Here's how to do it:
Connecting from a Linux or macOS Device
Linux and macOS come with a built-in SSH client. Open your terminal and type:
ssh pi@
You will be prompted to enter the password for the "pi" user. The default password is "raspberry," but it's highly recommended to change it for security reasons.
Connecting from a Windows Device
Windows 10 and later versions also include an SSH client. Open the Command Prompt or PowerShell and use the same command as above. If you prefer a graphical interface, you can use PuTTY, a popular SSH client for Windows.
Choosing the Best SSH Clients
While most operating systems come with built-in SSH clients, there are several third-party clients that offer additional features and a more user-friendly interface:
- PuTTY: A widely used SSH client for Windows that provides a graphical interface.
- Termius: A cross-platform SSH client available for Windows, macOS, Linux, iOS, and Android.
- MobaXterm: An advanced SSH client and remote desktop tool for Windows, offering a comprehensive set of features.
Choosing the right SSH client depends on your specific needs and preferences. Experiment with different options to find the one that suits you best.
Headless Setup for Raspberry Pi
A headless setup allows you to configure and use your Raspberry Pi without a monitor or keyboard. This is particularly useful in scenarios where the Raspberry Pi is located in a remote location or when you want to save space and resources.
Steps for Headless Setup
- Download the Raspberry Pi Imager and install the Raspberry Pi OS on an SD card.
- Create an empty file named "ssh" in the boot directory of the SD card to enable SSH.
- Create a file named "wpa_supplicant.conf" in the boot directory to configure Wi-Fi settings.
- Insert the SD card into your Raspberry Pi and power it on.
- Find the IP address of your Raspberry Pi using a network scanner or by checking your router's connected devices list.
- Connect to your Raspberry Pi using an SSH client.
With these steps, you can fully configure and operate your Raspberry Pi remotely without needing a monitor or keyboard.
Enhancing SSH Security
While SSH provides a secure method for remote access, it's important to take additional steps to enhance security:
Change the Default Password
The default password for the "pi" user is "raspberry," which is widely known. Change it immediately to something more secure:
sudo passwd pi
Disable Root Login
Disable root login to prevent unauthorized access:
sudo nano /etc/ssh/sshd_config
Set "PermitRootLogin" to "no" and restart the SSH service:
sudo systemctl restart ssh
Use SSH Keys for Authentication
Using SSH keys instead of passwords adds an extra layer of security. Generate a key pair on your local machine:
ssh-keygen
Copy the public key to your Raspberry Pi:
ssh-copy-id pi@
Troubleshooting Common SSH Issues
Even with careful setup, you might encounter issues when trying to SSH into a Raspberry Pi. Here are some common problems and their solutions:
Connection Refused
If you receive a "Connection refused" error, ensure that:
- SSH is enabled on your Raspberry Pi.
- The IP address you're using is correct.
- Firewall rules on your network allow SSH traffic.
Authentication Failed
If you encounter an "Authentication failed" error, double-check that:
- You're using the correct username and password.
- SSH keys are correctly configured if you're using them.
Use Cases for SSH in Raspberry Pi
SSH is a versatile tool with numerous applications for Raspberry Pi users:
- Remote File Management: Use SSH to transfer files between your local machine and Raspberry Pi using SCP or SFTP.
- Automated Tasks: Schedule and run scripts remotely to automate repetitive tasks.
- Headless Operations: Manage your Raspberry Pi without needing a monitor or keyboard.
- Monitoring Systems: Monitor the performance and status of your Raspberry Pi from anywhere.
These use cases highlight the flexibility and power of SSH in enhancing your Raspberry Pi experience.
Conclusion
Learning how to SSH into a Raspberry Pi opens up a world of possibilities for remote management and automation. By following the steps outlined in this guide, you can confidently set up and use SSH to interact with your Raspberry Pi from anywhere in the world.
We encourage you to explore the various use cases and experiment with different SSH clients to find the setup that works best for you. Don't forget to enhance your security measures to protect your Raspberry Pi from unauthorized access.
Feel free to leave a comment or share this article if you found it helpful. For more guides and tutorials, explore our other articles on our website.

![How to SSH Into Your Raspberry Pi Remotely [Simple Guide]](https://cd.linuxscrew.com/wp-content/uploads/2020/12/How-to-SSH-Into-Your-Raspberry-Pi-930x620.png)
